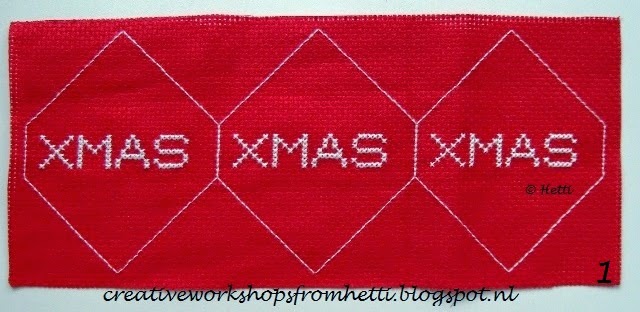
Met de voorbereidingen voor de feestdagen ben ik al begonnen. Om dit jaar een Scandinavisch tintje te geven heb ik kerstballen in die kleuren ontworpen. Ze zijn eigenlijk triangel vormig en daardoor heel makkelijk in elkaar te zetten. Ik heb er een kleine workshop van gemaakt zodat iedereen ze kan maken :-))
I am already begun with the preparing for the holidays. To give this year a Scandinavian look I have designed baubles in these colors. They are actually triangle shaped and therefore very easy to put together. I have made a small tutorial so that everyone can make them :-))
Workshop Kerstbal / Tutorial Xmas Bauble
Kijk eerst goed naar het patroon en de letters voor je begint!
Borduur het patroon met wit borduurgaren op rode Aida of geweven borduurstof van 5,5 kruissteken per cm. Dan wordt de bal ongeveer 7,5 cm breed en 8 cm lang.
Vervang evt. de geborduurde sneeuwvlokken voor decoratie sneeuwvlokken. Zie foto 1 en foto 9.
Please, look closely at the pattern and letters before you start!
Embroider the pattern with white embroidery thread on red Aida fabric or woven embroidery fabric of 5.5 crosstitches per cm. The ball shall be approximately 7.5 cm wide and 8 cm. long.
Replace if you like the embroidered snowflakes for decorations snowflakes. See photo 1 and photo 9.
Maak met stiksteken alle randen en ga 2 x over de middenstukjes, zie foto 2. Knip de stof NIET langs de randen af, maar vouw op de stiksteek randen naar achteren. Dat geeft stevigheid aan de bal en geen rafelranden.
Made with backstitches all edges and go 2 times on the middle pieces, see photo 2. Cut the fabric NOT along the edges, but fold on the backstitch edges backwards. This gives strength to the ball and no frayed edges.
Neem 1 draad Rood borduurgaren van 1 meter lang en vouw die dubbel en steek de losse einden door het oog van een stompe borduurnaald. Vouw de punten A tegen elkaar aan naar achteren en steek er een speld in, zie foto 3.
Take one strand Red embroidery thread of 1 meter long and fold in half and insert the loose ends through the eye of a blunt embroidery needle. Fold the points A to the back against each other and insert a pin in it, see picture 3.
Begin aan de punt A en neem aan weerszijden 1 stiksteekje op en steek de draad door de lus heen als aanhechting. Neem daarna steeds een steekje aan weerszijden op en werk zo naar het midden , zie foto 4.
Start at the point A and take on both sides one backstitch and insert the needle through the loop as beginning. Then take a backstitch at each side and work your way to the center, see picture 4.
Neem in het middenstuk beide stiksteken op om hetzelfde effect te krijgen als de rest van de steken en werk door naar de top van B. Maak 1 steekje extra op de laatste steek.
Take in the middle both backstitches to get the same effect as the rest of the stitching and work through to the top of B. Make one extra stitch in the last stitch.
Ga door naar C, zie foto 5, en maak 1 steekje extra bij de eerste steek. Ga naar beneden naar D.
Go to C, see picture 5, and make one extra stitch in the first stitch. Go down to D.
Vouw de punten van E naar binnen en werk weer naar boven E, zie foto 6.
Fold the points of E backwards and work to the top of E, see picture 6.
Laat het bovenste stukje open om de bal te vullen met Panda vulling of ander vulmateriaal. Neem een ophang koord of lint, vouw het dubbel en maak er een knoop in. Steek de koord tussen de vulling en maak het laatste stukje dicht. Zie foto 7.
Leave the upper part open to fill the ball with filling material. Take a hanging cord or ribbon, fold it in half and make a knot. Insert the cord between the filling and close the ball. See picture 7.
Met het laatste restje garen kunnen er kerstballetjes of klokjes aan gehangen worden.
Werk het draad af door een paar steekjes op elkaar en steek de naald naar binnen en kom aan de zijkant naar buiten. Knip de draad vlak langs de stof af. Zie foto 8.
With the last bit of thread you can attach Christmas balls or bells .
After that make a few stitches on each other and insert the needle in the ball and come out on one side. Cut the thread close to the fabric. See picture 8.
Als variatie kun je er sneeuwvlokken of andere decoraties op de bal plakken in plaats van te borduren. Hang er evt een kerstballetje of iets anders aan de onderkant van de bal.
Maak de kerstbal ook eens op witte borduurstof en borduur met rood borduurgaren. Of gebruik je eigen kleuren!!
As a variation, you can glue snowflakes or other decorations on the ball instead of embroidery. Hang a Christmas ball or something else at the bottom of the ball if you like.
Make the bauble also on white embroidery fabric and embroider with red embroidery thread. Or choose your own colors!!
Veel plezier met het borduren en maken van deze kerst decoraties!
Have fun with making this Christmas decorations!
Hetti ;-))