
If you have some time you can make this chicken in a afternoon and if you like to cross stitch, I have made a update with a design for the Workshop Chicken/ Humbug, clic Here.
Voor de Nederlandse Workshop Paas kippetje van stof klik Hier.
Ook heb ik een kruissteek ontwerp gemaakt voor het Geborduurde Kippetje, klik Hier.
Workshop Fabric Chicken

In this workshop you will create a Chicken from fabric. This Chicken is intended for Easter, but you get a very different Chicken if you use other colour and fabric combinations and accessories. I have chosen for a fresh spring fabric and an embroidered fabric.
Supplies;
2 pieces of fabrics with Easter motives 15 x 15 cm (6 “x6 “ )
1 piece of fabric for a tail 6 x6 cm (2, 5 inch x 2, 5 inch )
2 pieces of red felt; cut it in a shape of a beak and comb, see picture 1
2 eyes, buttons or eyes you can paste on fabric
2 pieces of matching ribbon
Material to fill the Chicken like Fiberfil
Sewing supplies witch matching thread
Attention Please!
The Chicken can be made in any format, but the fabrics must be square.
Advice;
Read first the description and take a close look at the pictures to understand the folding of the fabric.
The felt comb and beak on the picture are an example, cut them in shape with a scissor, a little bit bigger than on the picture. After sewing them in place you can trim the shape smaller if you like.
On one of the fabrics I have made a Bunny in cross stitch with my embroidery machine.
It is a hand cross stitch pattern from the book Meine Jahreszeiten of Acufactum.
Of course you can embroider other motives or apply other decorations.

Working Method;
Place 1 square of fabric right side up in front of you. Lay down the comb of red felt onto the fabric and fix with pins. See picture below.
Fold the beak of red felt double and lay it down onto the fabric inwards, and fix with a pin. See the picture below.

Lay down the second square of fabric with the right side down onto the first fabric. Fix with pins 3 sides of fabric on each other, the top, left side and the bottom. Note that the felt edges of beak and comb lay down against the edge of the fabric.
Between the comb and beak the seam is a quarter of a circular.
Draw with a pen the circular around a bobbin. See the picture below how you can do that.

Sew with a ¼ inch seam around the tree sides together. See picture below.

Fold the open side transverse open.
See the picture below.

Take the piece of fabric 6 x6 cm (2, 5 inch x 2, 5 inch ) and fold it double with the wrong side on each other. Make 2 folds in the fabric so you create a point.
See the picture below.

This triangle is going to be the tail of the chicken.

Lay the tail with the seam down neatly on the middle seam of the Chicken fabric and fix with pins.
Attention!
The tail is lying down on the bottom fabric of the chicken. You can check this because the red felt at the top of the comb is visible between the seams.
See the picture below.

Lay down the top of the fabric on the bottom fabric, the tail is between them. Note that the seams of the middle lay neatly on top of each other. Pin the layers just after the tail.
Sew together until just after the tail of the chicken. Leave the opening for turning.
Leave a long thread to close the chicken later on.
See the picture below.

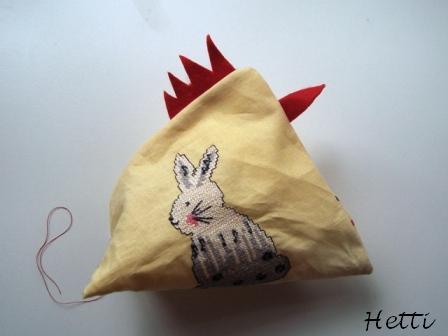
Turn the chicken right side out. Please be careful and don’t pull at the comb and beak of felt, which tear apart quickly. Use carefully a knitting needle or something like that, to get neat corners.
See the picture below.
Fill the chicken with Fiberfil or other fill material; make sure the corners and the roundness of the head are properly filled.
See the picture below.

Thread the needle with the long thread and stitch outwards. Hand stitch the opening or use a ladder stitch, see the picture below.

Thread a needle with a large eye one Ribbon and stitch just above the tail trough the fabric. Each ribbon separately otherwise arise holes or cracks in the fabric.
See the picture below.

Create a bow tie of the two ribbons. You can paste also a few feathers on the tail or add other decorations. See the picture below.

Paste two eyes on both sides of the head of the chicken.
You can also use two beads or buttons. Or two cross stitches with black embroidery floss are funny.
Cut the comb and beak in shape if necessary.
See the picture below.

If you like you can add some more feathers or decorations on the chicken.
Paste or sew two wings of felt on both sides of the chicken.
Now your Easter Chicken is ready!
Have fun and success in making the Easter Chicken,
With love, Hetti ;-))

So cute! Love the way you did the tail and I'll have to remember that trick to use a spool to get rounded corners!
BeantwoordenVerwijderenErgens in me paas versiering doos moet ik ook nog 2 van die kippen hebben liggen..
BeantwoordenVerwijderenDank je wel voor de tutorial!!!
Wat een mooie paaskip heb je gemaakt en heel makkelijk met de foto's erbij.
BeantwoordenVerwijderenLieve groetjes van Marion